Tampilkan postingan dengan label Vegetables. Tampilkan semua postingan

Rabu, 29 Oktober 2014

Pumpkin Pie with Hazelnut Crust

As with most years, the holiday season always seems to sneak up on me. We get so busy with day to day tasks, that I always seem to have unaccomplished projects or loose ends to tie up when the new year finally comes around. This year however, instead of rushing through, I want to make the most of every moment. There will never be enough time to do everything or see everyone, so the only thing I can do is be present in all the activities I do find time for. I have so much to be thankful for in my life, that when I sit down to think about it I become overwhelmed with happy thoughts and a very full feeling. Taking it all in, one day at a time, will remind me of all the positive things in my life and to celebrate each of them.
Pumpkin pie was always my favorite dessert on Thanksgiving and still is. Then I realized I don't even have a recipe for pumpkin pie on my blog yet. I think the reason for this was because I've been waiting until inspiration struck. There are already so many great version of pumpkin pie out there, I wanted something different to share. So even though I posted about a pumpkin hazelnut bread recently, I just couldn't help myself to combine the two together again.

This pie however, is something amazing! And will probably end up being made every year. The best part (besides how tasty it is), it's vegan, gluten free, and low in sugar. I know how hard it can be to accommodate everyone at the table, so this might be a good option if you're looking to make only one or two desserts for the table this year, but still have dietary restrictions to maintain. The filling is smooth and creamy and full of pumpkin flavor with slight hints of cinnamon and spice. For those of you who fear pie dough, this is a pat in the pan style crust, which means no rolling or chilling! It's super easy and stays together nicely.
The most important part in making this pie is to allow it to cool completely before cutting into it. The filling needs time to rest to hold its shape. You can make it the night before and you'll already be on top of your Thanksgiving game, just add any garnish right before serving. Also, using fresh spices and grinding them yourself will lead to a better spice flavor. At the very least, make sure the spices you use are fresh and haven't been sitting on your shelf since last year.

Elsewhere: Over on the Whole Living blog I have another recipe perfect for any last minute Thanksgiving vegetarian menu items you may be looking for, Roasted Delicata Squash & amp; Garlicky Kale with Parsley-Sage Dressing. I've been eating versions of it this whole month, it's so delicious. Enjoy your holiday! I'd love to know what you all are making this year too, anything special or different than usual?

Pumpkin Pie with Hazelnut Crust
makes one 9-inch pie

crust
1 3/4 cup + 1/4 cup hazelnuts, toasted
1 cup almond flour
1/2 cup coconut butter, melted
pinch of salt

pie filling
2 cups pumpkin puree
2/3 cup pure maple syrup or brown sugar
1/4 cup cornstarch or arrowroot
1 teaspoon pure vanilla extract
1/2 teaspoon salt
1 1/2 teaspoons ground cinnamon
1/2 teaspoon ground ginger
1/4 teaspoon ground nutmeg
1/4 teaspoon allspice
3/4 cup coconut milk

Preheat oven to 350˚F.

For the crust
Place the 1 3/4 cups hazelnuts into the bowl of a food processor. Pulse several times, then grind the nuts up to a coarse meal. Should take about 3-4 minutes. You don't want to blend too far or you'll end up with hazelnut butter.

Place the hazelnut meal into a medium bowl, add to it the almond flour, coconut butter, and a pinch of salt, blend until everything is well incorporated.

Dump the nut mixture out into a 9-inch pie pan and start pressing, from the center out, with your fingers, until you have an even crust all the way around, set aside.

For the filling
In a large bowl combine the pumpkin puree, maple syrup, cornstarch, vanilla, salt, and spices. Stir in the coconut milk until no white streaks are left behind. Pour the pumpkin mixture into the prepared pie crust.

Bake the pie in the center of the oven for about 1 hour (check after 50 minutes) or until the sides are completely set and the center jiggles only slightly when shaken lightly. Allow the pie to cool completely before cutting into. Pie can be made the night before and stored in the refrigerator. Right before serving coarsely chop the remaining hazelnuts and use for garnish. You can also top with whipped cream or creme fraiche, unless of coarse you're vegan.

Selasa, 28 Oktober 2014

Asian Cabbage Salad

These days walks to the post office or down to the beach start with layers upon layers of clothing and a briskness in each step. The sky is a faded blue and barely streaked with a few white clouds, the air feels clean, crisp, and cold. There are still trees holding tightly to their leaves, all shades of deep red, brilliant orange, bright yellow and even a few green ones still left; knowing that the first strong wind and rain storm to pass through is coming soon and will tear them from their worn out branches.

As I was preparing this salad, it reminded me exactly of my walks from these recent days. Studded with orange form the carrots, reds and greens from the peppers, and yellow green from the cabbage. Even though I usually crave warming foods this season, this salad was welcome if only for it's beautiful colors. It even tasted of the crispness in the air, if you can image.
It's not very often that I make salads with an Asian inspired dressing, but cabbage seems to beg to be dressed with all things sesame, soy, and vinegar. It comes together pretty quickly once everything has been chopped and if you have a food processor it makes the task of shredding even quicker.
This salad is still great the next day, but it's not quite as pretty because the cabbage begins to soak up lots of the dressing and sort of slumps over. I would however recommend giving it at least 30 minutes to really soak in the dressing before serving if you can.

Asian Cabbage Salad
Adapted from Moosewood Restaurant New Classics
serves 6-8

4 cups grated savoy or napa cabbage
2 cups peeled and grated carrots (about 2 large carrots)
4-5 fresh green and red chilis (use mild and hot varieties), seeded and minced
1 cup diced shallots
1 garlic clove, minced or pressed
2 tablespoons chopped fresh cilantro
roughly chopped peanuts or almonds for topping(optional)

dressing
2 tablespoons vegetable or other neutral oil
2 tablespoons dark sesame oil
3 tablespoons rice vinegar, or more to taste
2 tablespoons fresh orange juice
1 tablespoon mirin or dry sherry
1 tablespoon soy sauce
2 tablespoons honey or sugar, or to taste
pinch of salt

Place the cabbage, carrots, peppers, shallots, garlic, and cilantro in a large bowl (make sure it's large enough that you can toss everything without spilling everywhere).

In a separate smaller bowl, whisk together the dressing ingredients. Pour over the cabbage mixture and toss thoroughly. Taste and and more salt or vinegar if needed. Serve or refrigerate until ready to serve.

Minggu, 26 Oktober 2014

Roasted Brussels Sprouts

I probably only realized my love for brussels sprouts a few years ago. Like many, my youth brought mushy, boiled sprouts that never received a second thought, until they day I tasted them roasted.

This totally changed the game for me and now I eat my fill this time of year. But while I normally roast them in a high temperature oven, they would often still be missing a certain flavor or texture I was looking for. Then about a week ago I saw a technique on The Kitchn that has you actually broil them quickly instead. It made total sence and I couldn't wait to try.

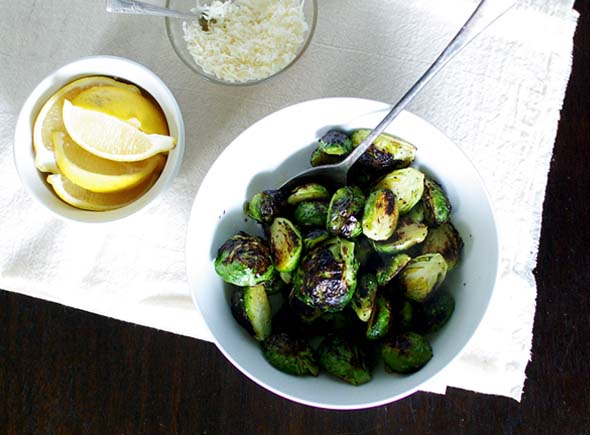
Tossed with a bit of olive oil, salt, and pepper, then thrown into a hot cast iron skillet before a quick roast under the broiler; it couldn't be any simpler. They turned out charred and smoky on the outside, with a perfectly cooked, but not mushy, inside. I went back for more. Even though this post is less of a recipe and more of a technique, I urge you to find yourself with a full bag of brussels sprouts and about 10 minutes of your time, because that's about all the time you'll need for this simple and healthy side dish.
A squeeze of lemon is all you really need to jazz them up a bit, but Parmesan is a nice touch if you do dairy too. I like to keep them on the side because I don't want the lemon juice to soften up the crispy outsides of the sprouts too soon.

Roasted Brussels Sprouts
adapted from The Kitchn
serves 4 as a side

1 1/2 pounds brussels sprouts, trimmed and outer leaves removed
1 tablespoon olive oil
1/2 teaspoon salt
1/2 teaspoon ground black pepper
lemon wedges for serving
2 tablespoons grated Parmesan cheese for serving (optional)

Place your oven rack at the very top and turn on the broiler and set a large cast iron skillet over high heat.

Cut the prepared brussels sprouts in half lengthwise, place in a large bowl and toss with the olive oil, salt, and pepper. When your cast iron pan is hot enough to where a water droplet evaporates on contact, pour all the brussels sprouts in and quickly flip them all over so their cut side is down. It's ok if they don't all fit just get them all in there and don't stir them around once they're set.

Place the skillet in the oven and broil for 3 minutes. The outer leaves should have started to darken and turn crispy. Keep them in for several minutes longer, about 5-7 minutes in total cooking time.

Serve immediately alongside lemon wedges and Parmesan cheese if using.

Sabtu, 25 Oktober 2014

Mini Twice Baked Potatoes with Spinach & White Bean Filling

I was recently invited by Guilt Taste to participate in reviewing some of their beautiful gourmet products. & nbsp;The first shipment was their Chef's Garden box from Farmer Jones Farm. It arrived on my doorstep late last week and after bringing it inside I headed straight to the kitchen to open what was inside. Carefully wrapped in insulated bubble wrap with a cold pack was a beautiful assortment of seasonal vegetables and herbs. I just about & nbsp;squealed & nbsp;with delight when I discovered the colorful little edible flowers (I guess the sight of flowers this time of year is exciting, considering most of what's outside right now around here is brown and dying). After carefully taking stock of what all was in there I had my mind set on making a healthy seasonal appetizer.

Everyone loves a two-bite sized appetizer, but most of the time they're a little on the unhealthy side, especially when it comes to twice baked potatoes. I decided to resolve that by adding a little & nbsp;protein & nbsp;(in the form of white beans) and spinach to the potato filling and seasoning it all with spices and fresh herbs. The result is so good you won't even miss the cream, butter, or cheese. & nbsp;
These are simple to make and don't really take much time to make aside from filling them, but they can be assembled a day ahead and quickly re-heated the next day to save yourself some time. It will seem like a lot of spinach when your done chopping, but once it cooks down it all fits in nicely. I had a little leftover, but I just nibbled that up myself. In fact, I could have eaten just the filling by itself, and decided you could make a lazy version of this as a meal and instead of filling the potatoes, just mash everything up together, maybe add more beans and seasoning and call it dinner.

Mini Twice Baked Potatoes with & nbsp;Spinach & amp; White Bean Filling
makes 24 small potatoes

24 small potatoes, scrubbed and washed well
2 tablespoons olive oil diveded
4 ounces spinach, washed and dried
1/2 cup cooked white beans
1 clove garlic, minced
1 teaspoon ground cumin
1/2 teaspoon salt
1/2 teaspoon ground black pepper
pinch of cayenne (optional)
1 tablespoon finely chopped fresh oregano

Preheat the oven to 425˚F. & nbsp;

Toss the potatoes in 1 tablespoon of the olive oil and a pinch of salt. Place on a baking sheet, pierce each with a fork, and bake for 20-25 minutes or until the potatoes are tender when pierced. Let cool for about 10 minutes or until you can handle them without burning yourself.

Once the potatoes are cool enough to handle, use a small spoon to hallow out the middle. Make sure to leave enough of the side so the potatoes maintain their structure. Transfer insides to a bowl and set aside.

Thinly slice the spinach into strips. The easiest way to do this is to stack each leaf on top of one another and slice with a sharp knife. In a large skillet, heat up the last of the olive oil. Gently cook the garlic for a minute, then add the beans, cooked potato flesh, cumin, salt, pepper, and cayenne, if using. Cook while mashing everything together with the back of a fork or a potato masher. Once everything is well mashed and incorporated stir in the spinach. Cook until spinach just begins to wilt. Turn off the heat and stir in the fresh oregano.

Take the hallowed out potato halves and fill them with the spinach mixture. I started this process trying to be really careful with a fork, but soon found it was much easier to really fill each potato if I held it in my hand and used my other hand to grab a bit of the filling and pack it down in. & nbsp;

At this point you can either pop them right back into the oven for about 8 minutes to warm up again or you can place them in the & nbsp;refrigerator until your ready to heat and serve. If cooking later, turn your oven back up to 425˚F and heat for 8-10 minutes. & nbsp;

Some tasty topping ideas would be sliced green onion, Greek yogurt, sour cream, & nbsp;caramelized & nbsp;shallots, chives, or more fresh herbs, and cheese. & nbsp;

* Full Disclosure: & nbsp;Guilt Taste graciously provided me the spinach, & nbsp;potatoes, garlic and oregano for this recipe. & nbsp;I was not paid and all photo's, text, and opinions are my own. & nbsp;

Jumat, 24 Oktober 2014

Chipotle Delicata Squash Soup

I thought I'd sneak in one more Fallish type soup before winter officially settles in and heartier stews and chiles start taking their place. Rich, creamy squash soups kind of waver on that line of hearty and filling like a stew though anyways, so I'll probably still be making this one through winter until we run out of squash. Or get tried of it, which ever comes first.

I really love winter squash combined with chiles and all things spicy. I typically go for that flavor combination over squash that's been sweetened with brown sugar and cinnamon, it's just too sweet for me. I had my mind set on using chipotle chiles in adobo sauce, a favorite of mine for when I want to add a distinct smoky flavor to things with a spicy kick to it too. It worked out perfectly, and the best part is how simple the recipe is and how few ingredients are needed. I love when that happens.
The soup is super creamy with just enough spice to it, where you know it's there, but your mouth isn't overwhelmed with heat. It's so rich and velvety and feels like there's cream in it, but that's the beauty of pureed squash.

I was originally going to make this using butternut squash, but when my csa box arrived and inside was a few delicata squash, plans changed. It happens, but I figured it would still turn out just as delicious. I'm sure most winter squash would work too, try butternut or kabocha. You should be able to find chipotle chiles in adobo sauce in any ethnic aisle of your grocery store. They come in a can and since there are always way more in there than I ever use in one recipe, I end up freezing the rest to use later. I also just found out you can keep them stored, tightly covered, in the fridge for about 3 months too.

Chipotle Delicata Squash Soup
serves 4-6

1 tablespoon olive oil
1/2 onion, roughly chopped
1 clove garlic, sliced
1 3/4 - 2 pounds delicata squash, peeled, seeded, and cubed into 1/2-inch pieces
5 cups vegetable broth
1 chipotle chile in adobo sauce
3/4 teaspoon ground cumin
1 teaspoon salt, plus more to taste

Heat a large saucepan over medium heat. Once hot add the oil and onion. Cook stirring frequently until the onion starts turning golden and caramelizing. Stir in the garlic and cook for 1 minute longer.

Add the squash and vegetable broth and bring everything to a gentle boil. Simmer for about 20 minutes or until the squash has softened. Stir in the chipotle chile, cumin, and salt. Cook for another 5 minutes.

If you have an immersion blender use it to puree the soup until completely smooth. Otherwise, use a blender and puree the soup in batches. Hot soup will explode out of a blender if filled too high, trust me. Taste and season with salt if needed. Serve hot with a handful of roasted squash seeds and a dollop of Greek yogurt or cashew cream if you're vegan.

Store any leftover soup tightly covered in the fridge for a couple days and re-warm before eating.

Kamis, 23 Oktober 2014

Shredded Brussels Sprout & Tangerine Salad

It's the end of & nbsp;February, which also means the official end of winter (although unfortunately maybe not winter weather), so today & nbsp;I'm sharing one last seasonal salad with you. I meant to get this recipe to you yesterday, but seeing as our usual morning csa delivery didn't arrive until around 6pm last night, the brussels sprouts I knew the box would contain, didn't arrive in time before I had a chance to prepare and photograph this salad.

All weekend I was thinking about these brussels sprouts and how & nbsp;I would savor them & nbsp;because & nbsp;I knew this would probably be the last bunch until next season. & nbsp;I thought a light salad, something that would ease its way into spring with a crisp freshness and touch of brightness, would be a good option. Something raw to enter a soon-to-be season of young fresh veggies, but still hanging onto the citrus of winter.
Truth be told, I also needed to think of a recipe I knew would be relatively quick to prepare. In the previous weeks I've been up to my ears in projects and exciting new things we're working on for our shop. I'm not usually a pro thirty minute meal or less kinda person, but I can appreciate a quick whole food recipe when I need one, especially when I can't stand to eat another sandwich or plate of leftovers.

I had picked up a bag of whole wheat Israeli couscous out of curiosity. I'd never cooked with this little bead shaped grain before and the fact that I saw it would take less than 15 minutes to cook, might also be why it made its way into my cart that day. I added it to the shredded brussels sprouts for some extra heft. My favorite part of this salad is when you get a sweet squirt of tangerine juice when taking a bite, also the unexpected but so delicious taste of basil.

This was another recipe that started out as something from The Food Matters Project, as you can see I'm not very good at following recipes, but at least I still used brussels sprouts! This weeks pick was by Marcia and to view a complete list of others who participated you can visit the website.

Shredded Brussels Sprout & amp; Tangerine Salad / serves 4

I really think any grain (quinoa, millet, barley, farro) would work here in place of the couscous. You can segment the tangerines if you like too, & nbsp;I kept it simple and didn't bother.

1/2 cup dry whole wheat Israeli couscous or 1 cup other cooked grain of choice
1/2 & nbsp;lb. brussels sprouts
1/4 of a red onion, thinly sliced
handful of fresh basil, chiffonade (about 1/4 cup)
3 tablespoons olive oil
2 tablespoons fresh lemon juice
1 tablespoon red wine vinegar
1 clove garlic, minced
a couple big pinches salt, plus more to taste
3 tangerines
1/4 cup toasted walnuts

Bring a small saucepan filled with 1 cup water to a boil. Stir in couscous and cook at a simmer for 8 minutes. Drain and set aside to cool slightly.

Meanwhile, using a & nbsp;mandolin & nbsp;or sharp knife, slice the brussels sprouts as thinly as you can and place them in a large mixing bowl. Add in the red onion, basil, and couscous and give everything a good toss.

In a small bowl whisk together the olive oil, lemon juice, vinegar, garlic, and salt. Pour over the brussels sprout mixture and toss until everything is thoroughly dressed, seasoning with salt to taste. Add in the tangerines, then just before serving, top with walnuts.

Rabu, 22 Oktober 2014

Pasta with Roasted Tomato Sauce

Sunday night I received a call from my cousin Tom.

"Hey, what are you doing Wednesday night? I'm coming up for work and wanted to see if you'd like to plan on having dinner at grandpas while I'm in town."

I thought to myself, boy I have a busy week, "I'll check my schedule and get back to you."

Right after getting off the phone, a bit of my oldest grand daughter guilt set in. I crossed my fingers that I didn't have anything going on that night. We were free! I called him back the next day and we made arrangements for dinner.

Grandpa was making chicken and vegetables in the crock pot. Tom would make a salad and get some bread. I was left to come up with something to share that I could enjoy as well as everyone else. All I could think about was pasta.
My grandpa, the same one who taught me how to make these biscotti, was raised by an Italian mother and 2 Aunts who were always in the kitchen, always cooking. He's probably eaten some of the best pasta any Italian could ask for. The key to good Italian food, or any food if you ask me, is finding the freshest ingredients you can buy. I didn't have any time to make fresh pasta, but I collected herbs from the garden, picked up a large bunch of vine-ripened tomatoes and set out to make pasta the Italian way.

Roasting tomatoes and garlic soon filled the house with familiar smells. It's amazes me every time I make this how quickly such a tasty plate of pasta comes together and with so few ingredients. The longest part is the roasting of the tomatoes, but it's so worth the time.
Vine-ripened tomatoes have more juice than other varieties, but don't worry about it, most of the extra water will be left in the roasting pan. You can use most any other varieties if you prefer. Also, you may be thinking, shouldn't I cut them smaller, but the beauty of roasting them is that they become soft, so by the time you mix everything up they practically fall apart into bits of tomato for you. Serving this as soon as you finish making it will provide the best results and flavors. Omit the mozzarella for a vegan option, it's still just as tasty without.

Pasta with Roasted Tomato Sauce
serves 6-8

2 lbs tomatoes (about 5-6 large tomatoes)
3-4 garlic cloves, sliced
2-3 tablespoons olive oil
big pinch of re pepper flakes
salt and fresh ground pepper to taste
1/2 cup mixed herbs, I used basil, Italian parsley, and oregano
3/4 lb linguini
1/2 cup Kalamata olives or other brine-cured olives, sliced
8 oz. mozzarella, cubed (optional)

Preheat the oven to 350˚F.

Core and slice tomatoes no more than 1/4-inch in thickness and place on a baking sheet taking care not to over lap; I needed two. Toss the garlic, red pepper flakes, and salt and pepper over the tomatoes, drizzle with olive oil, and place in the oven for 45 minutes to 1 hour.

Meanwhile, chop the herbs, and prepare the olives and mozzarella if using, set aside. Cook pasta according to package directions, drain and reserve until tomatoes are done.

Toss the pasta with the roasted tomatoes and herbs, then stir in the olives and mozzarella and season with salt. Drizzle with more olive oil if needed and serve warm.

Chickpea Noodle Soup

Hot soups were only vaguely on my mind before leaving to D.C. last week. Even though there was an obvious difference in the morning air, the day time temperatures were still reaching the low 70's. By the time I came back however the clouds had settled in, the misty cool air made me reach for a warm cozy sweater and soup was all I could think about.

In fact I've already made several this past week. The day of my return I opened up my first jar of summers tomatoes and made a big pot of tortilla soup. So good with fresh tortilla chips and a subtle reminder that summer was not too long ago. Then I turned to another favorite; lentil soup, which I don't think I will ever tire of, no matter how long our winter decides to be this year.

Last night I decided I wanted something I've never made before. I had chickpeas and spaghetti noodles, carrots and fresh radishes just pulled from the garden, so I settled on the idea of a chickpea noodle soup as a sort of vegetarian riff on chicken noodle soup. The ingredients are so few and usually ones most people stock in their kitchen. The only unfamiliar one may be the white miso. I love adding miso to soups, plus it has many good for you qualities too. The stuff seems to last forever and can really add depth to soups and dips, I encourage you to add it to your diet if you haven't already.
This had to be one of the quickest soups I've ever made. Seriously it takes about as long as it takes to cook the pasta noodles and you're already spooning out yourself a piping hot bowl. Radishes didn't actually go into this soup, but their vibrant green tops did! I love eating my veggies from root to leaf (as long as they're edible). The undersides of radish leaves have little pokeys, much like nettles, although these won't sting, but once you cook them down they go away, you just want to make sure to cut whatever greens you use into manageable sizes to eat.

Chickpea Noodle Soup
serves 4-6

8 cups water or vegetable broth
2 tablespoons white miso
2 teaspoons sea salt
1/2 teaspoon garlic powder
2 large carrots, sliced on the diagonal
12 ounces whole wheat spaghetti noodles, broken in half
4 cups cooked chickpeas or 2-14oz. cans, drained and rinsed
1 bunch dark leafy greens such as kale, chard, or in my case radish top, cut to bite size pieces
1 tablespoon olive oil
fresh ground black pepper to taste

Place the water or broth into a large pot over high heat and bring to a boil. Scoop out about 1 cup of the water into a small bowl and stir in the miso until it's completely dissolved. This just helps make it easier to combine with the soup. Pour the miso and water back into the pot and stir in the salt, garlic powder, sliced carrots, noodles, and chickpeas.

Continue to cook for 8-12 minutes or until your noodles are al dente. Turn off the heat and stir in the leafy greens. They will begin to slowly wilt and cook from the heat of the broth. At this point taste and add more salt if needed.

Serve soup hot with a drizzle of olive oil and fresh ground black pepper.

Minggu, 19 Oktober 2014

Almond Crusted Tofu with Roasted Red Pepper Sauce

Being in a creative field I'm often asked & nbsp;"where do you get your inspiration from?" It's a simple question, but one that's not always so easy to answer. I have my usual response that's pretty straight forward, but really I believe that most of the time inspiration is built up from moments and little fragments of life, overlapping and layering until, wham! An idea strikes. It may seem like it just came to you but, really it was there all along waiting for all the dots to connect and the outcome to present itself. The few occasions that I do seem to be searching for that one perfect idea, always seem to prove a lost cause, at least for me anyway. Give it time, it will come, is how I operate.

When it comes to creating meals in the kitchen, my inspiration works in somewhat the same way, but with a unique twist. Often I'll find a single carrot or that last bit of quinoa at the back of the cupboard, anything that needs to be used up, and a meal idea starts to form. Maybe I'll pull out a cookbook or two, maybe I remember something my mom or grandma used to cook, or something I once ate in a & nbsp;restaurant. Sometimes I just wing it and & nbsp;see what I end up with.
So this past week when I flipped to a recipe for roasted red pepper and walnut pesto in Mark Bittman's The Food Matters Cookbook, I already had a different idea starting to form based on what I had in the fridge. A half empty jar of roasted red peppers from a few nights before, tofu, almonds, and a big bunch of cilantro I had just purchased. I'm so use to using what I have on hand, that I didn't want to head back out into the rain for another grocery run, so those ingredients would have to do.

Soon I had almonds in the food processor grinding down into a course meal to coat the tofu in. Then the last bit of roasted peppers went into the processor along with the cilantro, garlic, a bit of olive oil, and a pinch of salt. The result was not pesto, but a really lovely salsa-esque sauce. I cooked up some black rice, made some of my favorite garlicky mixed greens and served the tofu with the red pepper sauce drizzled over the top. Even though it was way off from the original recipe, it was still a really amazing outcome. One I don't think would have happened without that little seed of inspiration, that all started with The Food Matters Project. It's really fascinating seeing what others get from looking at the same basic recipe idea and how they & nbsp;interpret & nbsp;it. So... what inspires you?

Almond Crusted Tofu with Roasted Red Pepper Sauce & nbsp;/ & nbsp;serves 2
Recipe inspired by The Food Matters Cookbook. Get the full recipe at Girliechef and the FMP blog.

I used a jar of roasted red peppers in water, but you can also use fresh red bell peppers and roast them yourself. I served the tofu over black rice with a side of my favorite garlicky greens.

for the sauce
6 oz. jar roasted red peppers in water, drained
2 garlic cloves
big handful fresh cilantro, about a 1/4 cup packed
1 tablespoon olive oil
pinch of sea salt

for the tofu
6-8 oz. extra firm tofu, drained and pressed
1/2 cup raw almonds
couple pinches sea salt
couple pinches ground black pepper
1-2 tablespoons olive oil

For the sauce, place all the ingredients in a small food processor and blend until smooth, set aside.

Place the almonds in a food processor and blend until they become a coarse almond meal. Dump out into a shallow bowl and stir in the salt and black pepper.

Cut the the tofu in half lengthwise and widthwise, then diagonally (see images). Place a tofu triangle in the almond mixture and coat on all sides, repeat with each slice. Heat a skillet (I used cast iron) over medium-high heat. Pour in enough oil just to coat the bottom of the pan. Once the oil is hot, carefully place the tofu slices into the pan. Cook for 2 minutes & nbsp;or until golden brown without moving, then flip and cook for another 2 minutes. Plate the tofu slices and pour the roasted red pepper sauce over the top, serve & nbsp;immediately.

Sabtu, 18 Oktober 2014

Pumpkin Pie with Hazelnut Crust

As with most years, the holiday season always seems to sneak up on me. We get so busy with day to day tasks, that I always seem to have unaccomplished projects or loose ends to tie up when the new year finally comes around. This year however, instead of rushing through, I want to make the most of every moment. There will never be enough time to do everything or see everyone, so the only thing I can do is be present in all the activities I do find time for. I have so much to be thankful for in my life, that when I sit down to think about it I become overwhelmed with happy thoughts and a very full feeling. Taking it all in, one day at a time, will remind me of all the positive things in my life and to celebrate each of them.
Pumpkin pie was always my favorite dessert on Thanksgiving and still is. Then I realized I don't even have a recipe for pumpkin pie on my blog yet. I think the reason for this was because I've been waiting until inspiration struck. There are already so many great version of pumpkin pie out there, I wanted something different to share. So even though I posted about a pumpkin hazelnut bread recently, I just couldn't help myself to combine the two together again.

This pie however, is something amazing! And will probably end up being made every year. The best part (besides how tasty it is), it's vegan, gluten free, and low in sugar. I know how hard it can be to accommodate everyone at the table, so this might be a good option if you're looking to make only one or two desserts for the table this year, but still have dietary restrictions to maintain. The filling is smooth and creamy and full of pumpkin flavor with slight hints of cinnamon and spice. For those of you who fear pie dough, this is a pat in the pan style crust, which means no rolling or chilling! It's super easy and stays together nicely.
The most important part in making this pie is to allow it to cool completely before cutting into it. The filling needs time to rest to hold its shape. You can make it the night before and you'll already be on top of your Thanksgiving game, just add any garnish right before serving. Also, using fresh spices and grinding them yourself will lead to a better spice flavor. At the very least, make sure the spices you use are fresh and haven't been sitting on your shelf since last year.

Elsewhere: Over on the Whole Living blog I have another recipe perfect for any last minute Thanksgiving vegetarian menu items you may be looking for, Roasted Delicata Squash & amp; Garlicky Kale with Parsley-Sage Dressing. I've been eating versions of it this whole month, it's so delicious. Enjoy your holiday! I'd love to know what you all are making this year too, anything special or different than usual?

Pumpkin Pie with Hazelnut Crust
makes one 9-inch pie

crust
1 3/4 cup + 1/4 cup hazelnuts, toasted
1 cup almond flour
1/2 cup coconut butter, melted
pinch of salt

pie filling
2 cups pumpkin puree
2/3 cup pure maple syrup or brown sugar
1/4 cup cornstarch or arrowroot
1 teaspoon pure vanilla extract
1/2 teaspoon salt
1 1/2 teaspoons ground cinnamon
1/2 teaspoon ground ginger
1/4 teaspoon ground nutmeg
1/4 teaspoon allspice
3/4 cup coconut milk

Preheat oven to 350˚F.

For the crust
Place the 1 3/4 cups hazelnuts into the bowl of a food processor. Pulse several times, then grind the nuts up to a coarse meal. Should take about 3-4 minutes. You don't want to blend too far or you'll end up with hazelnut butter.

Place the hazelnut meal into a medium bowl, add to it the almond flour, coconut butter, and a pinch of salt, blend until everything is well incorporated.

Dump the nut mixture out into a 9-inch pie pan and start pressing, from the center out, with your fingers, until you have an even crust all the way around, set aside.

For the filling
In a large bowl combine the pumpkin puree, maple syrup, cornstarch, vanilla, salt, and spices. Stir in the coconut milk until no white streaks are left behind. Pour the pumpkin mixture into the prepared pie crust.

Bake the pie in the center of the oven for about 1 hour (check after 50 minutes) or until the sides are completely set and the center jiggles only slightly when shaken lightly. Allow the pie to cool completely before cutting into. Pie can be made the night before and stored in the refrigerator. Right before serving coarsely chop the remaining hazelnuts and use for garnish. You can also top with whipped cream or creme fraiche, unless of coarse you're vegan.

Jumat, 17 Oktober 2014

Curried Lentil Soup


Curry was never a staple in our home when I was growing up. I don't think I even had my first bite of curry or eastern European food food until my late high school or early collage years. But once I did, it became a favorite when dining out. Such an array of different spices I'd never tasted before, it was like a whole new food group opened up to me.
 I say when dining out because early in my cooking days when I'd come to a recipe that had a very long list of ingredients it would usually get passed up for something simpler. It never occurred to me that that long list of ingredients was mostly made up of spices and for the most part was probably something relatively easy to make.
 This is where making your own homemade curry powder or spice mix comes into great use. You can save a great deal of time mixing all those spices together in one go, rather than for just one meal. You also have a greater advantage over flavor preference. The curry recipe I've provided below is a pretty simple one using many of the spices I already have on hand most of the time. You can change it to be more spicy or add in cinnamon or fennel for another version. It's really all up to you, which is what I love.
 Using whole spices and grinding them in a spice mill ensures the freshness of your spices. I used mostly
pre-ground below, make adjustments as needed if you use them in their whole form. The most interesting part of this soup was the addition of pureed chickpeas, almost like a very basic hummus. It made the soup feel heartier and fuller, without the addition of cream. I gave each bowl an extra good squeeze of lemon
before serving, I love the way lemons add that perfect twist to lentils and spices. Curried Lentil Soup adapted from Bon Appétit serves 4 3 tablespoons olive oil, divided 1 medium onion, chopped 2 medium carrots, finely chopped 2 large garlic cloves, chopped, divided 2 tablespoons curry powder (recipe below) 1 cup French green lentils 4 1/4 cups water, divided 2 cups cooked chickpeas or 1 15oz. can drained and rinsed 1 tablespoon fresh lemon juice 4 green onions, thinly sliced additional lemon for serving, optional Homemade Curry Powder makes about 1/4 cup 2 tablespoons ground cumin 2 tablespoons coriander 1 teaspoon turmeric 1/2 teaspoon cayenne 1 teaspoon whole mustard seeds 1/2 teaspoon ground ginger In a spice mill or food processor, combine all the spices. Process until everything becomes a fine powder. Store in a tightly covered container. for the soup Heat 1 tablespoon oil in a large pot over medium heat. Stir in the onion and carrot and season with a pinch of salt and pepper. Cook until the onion is translucent, stirring occasionally, about 5 minutes. Add half the chopped garlic and cook until the carrots have softened, about 4 minutes longer. Add 2 tablespoons of the curry powder, stirring until everything is coated and becomes fragrant, about 1 minute. Add the lentils and 4 cups water. Increase the heat and bring to a boil. Then reduce the heat to medium and simmer until the lentils are tender, about 30 minutes. Meanwhile, puree the chickpeas, lemon, 1/4 cup water, remaining 2 tablespoons olive oil, and remaining garlic in a food processor. When the lentils are tender, stir in the chickpea puree. Season with salt and pepper to taste, adding additional curry powder if desired. Serve soup warm, garnished with chopped green onions and extra lemon wedges. Store any left over soup covered in the refrigerator for a couple of days. Reheat before serving.

Mexican Black Beans and Sweet Potatoes

If you've been reading this blog for some time now, or checked out my archives, you may have noticed that beans are a staple food in my kitchen. I prefer to buy them dried over canned mostly because I think they taste so much better, but it also doesn't hurt that they're much cheaper that way to. I do have canned beans for those days that I need a quick meal and haven't planned ahead, but cooking beans is really not very hard and I think you should give it a try if you haven't already. 

Place your desired amount of dried beans into a large bowl, then fill with water, covering the beans by about 2-3 inches. Let them sit overnight while you sleep or while you're away at work during the day. After letting them sit anywhere from 6-10 hours the beans should be plumper and the water level will have gone down. Now you can drain the beans and give them a good rinse before placing them into a large heavy pot and covering again with fresh cool water. I never measure anything when cooking beans, but I do always cover the beans a good 3-4 inches so I know there will be enough water when they start cooking. 

Place the pot with the water and beans over medium-high heat and bring to a boil. Let the beans boil for about 5-10 minutes, then turn down the heat and cover, simmering for about 40-60 minutes. The cooking time can really vary depending on how long you let the beans soak, what variety and size they are, and depending on how fresh your beans are. The older they are the longer it will take for them to cook, so I recommend buying your beans from places with a high turn over. When they're cooked remove from heat, drain and store tightly covered in your refrigerator or freezer. This may seem like a lot of work, but the active time is really very little and you can cook a lot at once and eat them through the week or freeze them up to 4 or 5 months for later.
Having a large amount of beans already cooked and staring back at me in from the fridge, inspired me to use them up in a Mexican style dish. I grabbed my last sweet potato, added some spices, herbs, garlic and a jalapeño and drenched them with fresh lime juice for a tasty side dish that easily becomes a meal when placed inside corn tortillas and placed alongside some rice and salad.
If you're still looking for another side dish to accompany a Cinco de Mayo feast this week, this would make a great addition. I placed my avocado on top, but it would be great mixed in as well. Other great toppings would be salsa, grated cheese and sour cream. I recommend starting with half the juice of lime and tasting before you add more, it's not meant to overpower, but some people like a little extra pucker. Also this was not very spicy to me, if you want it spicier leave in some of those jalapeño seeds.

Mexican Black Beans and Sweet Potatoes
serves 4 as a main or 6 as a side

2 cups peeled and diced sweet potato, about 1 large or 2 small potatoes
2 tablespoons olive oil
1 teaspoon cumin
1 teaspoon chile powder
salt and pepper

2 tablespoons olive oil
2 cloves garlic, finely chopped
1 jalapeño, seeded and finely chopped
3 cups cooked black beans
1/2 cup chopped cilantro
1 lime
1 avocado, cubed

Preheat the oven to 450˚F. Toss the diced sweet potatoes in the 2 tablespoons of olive oil, cumin, chile powder, and salt and pepper. Place on a rimmed baking sheet and bake for 20-25 minutes or until the sweet potatoes have softened.

While the potatoes are cooking, heat the tablespoon of oil in a large skillet over medium heat. Add to it the garlic and cook until it just begins to turn golden brown. Toss in the jalapeño, and beans. Cook until the beans are heated through, then turn off the heat.

Once the potatoes are out of the oven, add them to the bean mixture along with the cilantro and gently stir everything together. Squeeze juice of half the lime over everything, adding more to your taste. 

Serve garnished with avocado or any other topping you wish. Store leftovers covered in the refrigerator.